React JS + Spring Boot - Hello World Example
In the section, we will create a project for Hello Word Example with Spring Boot and React JS.
.png)
Part 1 - Backend development
Step 1: Creating a simple spring boot web application.
First, open the Spring initializr https://start.spring.io/ Then, Provide the Group and Artifact name. We have provided Group name com.knf.dev.demo and Artifact helloworld. Here I selected the Maven project - language Java - Spring Boot 3.0.1 and add Spring web dependency.

Then, click on the Generate button. When we click on the Generate button, it starts packing the project in a .zip(helloworld.zip) file and downloads the project.
Then, Extract the Zip file.
Step 2: Import the project on your favourite IDE, I am using IntelliJ IDEA
Final Project Directory:

Pom.xml
<?xml version="1.0" encoding="UTF-8"?>
<project xmlns="http://maven.apache.org/POM/4.0.0"
       xmlns:xsi="http://www.w3.org/2001/XMLSchema-instance"
   xsi:schemaLocation="http://maven.apache.org/POM/4.0.0
   https://maven.apache.org/xsd/maven-4.0.0.xsd">
   <modelVersion>4.0.0</modelVersion>
   <parent>
      <groupId>org.springframework.boot</groupId>
      <artifactId>spring-boot-starter-parent</artifactId>
      <version>3.0.1</version>
      <relativePath/> <!-- lookup parent from repository -->
   </parent>
   <groupId>com.knf.dev.demo</groupId>
   <artifactId>helloworld</artifactId>
   <version>0.0.1-SNAPSHOT</version>
   <name>helloworld</name>
   <description>Demo project for Spring Boot</description>
   <properties>
      <java.version>17</java.version>
   </properties>
   <dependencies>
      <dependency>
         <groupId>org.springframework.boot</groupId>
         <artifactId>spring-boot-starter-web</artifactId>
      </dependency>

      <dependency>
         <groupId>org.springframework.boot</groupId>
         <artifactId>spring-boot-starter-test</artifactId>
         <scope>test</scope>
      </dependency>
   </dependencies>

   <build>
      <plugins>
         <plugin>
            <groupId>org.springframework.boot</groupId>
            <artifactId>spring-boot-maven-plugin</artifactId>
         </plugin>
      </plugins>
   </build>

</project>
HelloWorldController.java
package com.knf.dev.demo.helloworld.controller;

import org.springframework.web.bind.annotation.CrossOrigin;
import org.springframework.web.bind.annotation.GetMapping;
import org.springframework.web.bind.annotation.RequestMapping;
import org.springframework.web.bind.annotation.RestController;

@CrossOrigin(origins = "*", maxAge = 4800)
@RestController
@RequestMapping("/api/v1/")
public class HelloWorldController {

    @GetMapping("/hello")
    public String hello() {
        return "Hello World";
    }
}
HelloworldApplication.java
package com.knf.dev.demo.helloworld;

import org.springframework.boot.SpringApplication;
import org.springframework.boot.autoconfigure.SpringBootApplication;

@SpringBootApplication
public class HelloworldApplication {

   public static void main(String[] args) {
      SpringApplication.run(HelloworldApplication.class, args);
   }
}
Step 3: Test the APIs using postman

Part 2: Frontend Development
Step 1: Install Node.js
To check if node.js is installed on your system, type node -v in the terminal. This will help you see the version of node.js currently installed on your system.

If it does not print anything, install node.js on your system. To install node.js, go to the homepage, https://nodejs.org/en/download/ of node.js, and install the package based on your OS.
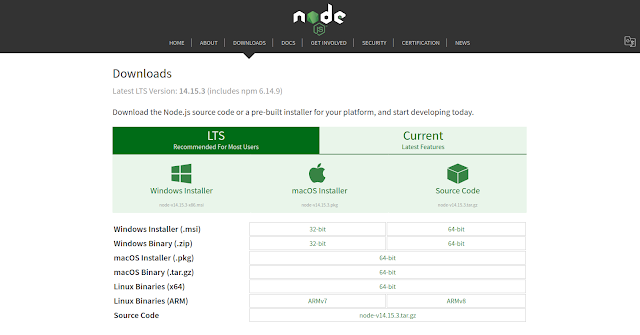
Based on your OS, install the required package. Once node.js is installed, npm will also get installed along with it. To check if npm is installed or not, type npm –v in the terminal as given below. It will display the version of the npm.

Step 2:create-react-app
We don't want to configure React manually, because it is complicated and takes a lot of time. create-react-app is a much easier way which does all the configuration and necessary package installations for us automatically and starts a new React app locally, ready for development.
Another advantage of using create-react-app is that you don't have to deal with Babel or Webpack configurations. All of the necessary configurations will be made by create-react-app for us.
In order to install your app, first, go to your workspace and run the following command:
npx create-react-app my-app

The installation process may take a few minutes. After it is done, you should see a folder that appears in your workspace with the name you gave to your app. Once it is successfully installed, You should get a similar output:

Step 3: Install Axios
npm install axios
Final Project Directory

package.json
{ "name": "my-app", "version": "0.1.0", "private": true, "dependencies": { "@testing-library/jest-dom": "^5.16.5", "@testing-library/react": "^13.4.0", "@testing-library/user-event": "^13.5.0", "axios": "^1.2.2", "react": "^18.2.0", "react-dom": "^18.2.0", "react-scripts": "5.0.1", "web-vitals": "^2.1.4" }, "scripts": { "start": "react-scripts start", "build": "react-scripts build", "test": "react-scripts test", "eject": "react-scripts eject" }, "eslintConfig": { "extends": [ "react-app", "react-app/jest" ] }, "browserslist": { "production": [ ">0.2%", "not dead", "not op_mini all" ], "development": [ "last 1 chrome version", "last 1 firefox version", "last 1 safari version" ] }}HelloWorldService.js
import axios from 'axios';
const USER_API_BASE_URL = "http://localhost:8080/api/v1/";
class HelloWorldService {
    getMessage(){        return axios.get(USER_API_BASE_URL+"hello");    }}
export default new HelloWorldService()ViewMessageComponent.js
import React, { Component } from 'react'import HelloWorldService from '../services/HelloWorldService'
class ViewMessageComponent extends Component {    constructor(props) {        super(props);        this.state = {message: ''};    }
    componentDidMount() {        HelloWorldService.getMessage().then(res => {            this.setState({ message: res.data });        })    }
    render() {        return (            <div>                <div> {this.state.message}</div>            </div>        )    }}
export default ViewMessageComponentApp.js
import ViewMessageComponent from './components/ViewMessageComponent';
function App() {  return (    <div>      <ViewMessageComponent />    </div>  );}
export default App;
Run the application
Step 1: Download or clone the source code from GitHub to a local machine - Click here
Backend
Step 2: mvn clean install
Step 3: Run the Spring Boot application - mvn spring-boot:run
Frontend
Step 4: npm install
Step 5: npm start
Step 1: Download or clone the source code from GitHub to a local machine - Click here
Backend
Step 2: mvn clean install
Step 3: Run the Spring Boot application - mvn spring-boot:run
Frontend
Step 4: npm install
Step 5: npm start


Comments
Post a Comment