Google Cloud SQL for PostgreSQL + Spring Boot - Build REST CRUD APIs
In this section, we will learn how to build REST CRUD APIs with Spring Boot, and Google Cloud SQL for PostgreSQL.

1. A little bit of Background
Google Cloud SQL for PostgreSQL
Spring Boot
2. Create a GCP Project
First, Sign into the Google console at https://console.cloud.google.com.
You can create a new project by first selecting the project dropdown in the top left and selecting "New Project".

Next, specify your GCP Project name and Project ID.
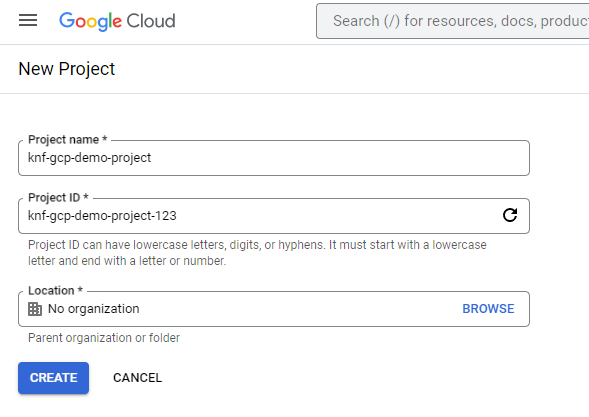
Then Click on the "CREATE" button.
Copy "Project ID" and keep it for future purposes.
3. Create a Cloud SQL for PostgreSQL instance.
From cloud console, search for "SQL" like below and click on "SQL" button.

Next, click on "CREATE INSTANCE" button,

Then, click on "Choose PostgreSQL" button,

Then, enable the Compute Engine API by click on "ENABLE API" button.


Note "Password" and keep it safely for future purposes.
Then click on "CREATE INSTANCE" button,
Next, copy "Connection name" and keep it for future purposes.

4. Create a Database.
Click on "CREATE DATABASE" button,
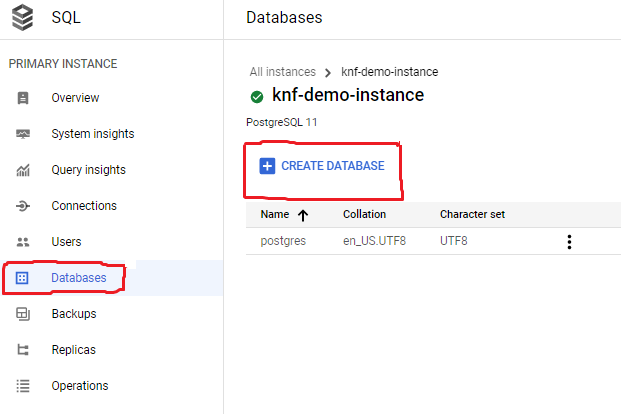

Copy "Database name" and keep it for future purposes.
5. Enable SQL admin API
From cloud console, search for "sqladmin API" like below and click on "sqladmin API" button.

Next, click on "ENABLE" button,

6. Create a service account key
First choose "IAM & Admin" and then click on "Service accounts".

After that, click on "CREATE SERVICE ACCOUNT".

Then, enter service account details like "Service account name", and "Service account ID" and click on "CREATE AND CONTINUE".

Then, grant basic role Editor.

Finally click on "DONE" button.
Then, from "Actions" click on "Manage keys".


Service account keys in JSON format will be download. Keep the file safe for future purposes.

7. Creating a simple spring boot web application
First, open the Spring initializr https://start.spring.io/
Then, Provide the Group and Artifact name. We have provided Group name com.knf.dev.demo and Artifact spring-boot-gcp-sql-postgresql-crud. Here I selected the Maven project - language Java 17 - Spring Boot 3.0.4 and add Spring web dependency, and GCP Support.

Then, click on the Generate button. When we click on the Generate button, it starts packing the project in a .zip(spring-boot-gcp-sql-postgresql-crud) file and downloads the project. Then, Extract the Zip file.
Then, import the project on your favourite IDE.
Final Project directory:

Note: Place service account key JSON file in resources folder (Not recommended in production environment).
In the pom.xml, add CloudSQL Starter for PostgreSQL:
<!-- Add CloudSQL Starter for PostgreSQL -->
<dependency>
   <groupId>com.google.cloud</groupId>
   <artifactId>spring-cloud-gcp-starter-sql-postgresql</artifactId>
</dependency>
<!-- Add CloudSQL Starter for PostgreSQL -->
<dependency>
<groupId>com.google.cloud</groupId>
<artifactId>spring-cloud-gcp-starter-sql-postgresql</artifactId>
</dependency>
Complete pom.xml
<?xml version="1.0" encoding="UTF-8"?>
<project xmlns="http://maven.apache.org/POM/4.0.0"
       xmlns:xsi="http://www.w3.org/2001/XMLSchema-instance"
   xsi:schemaLocation="http://maven.apache.org/POM/4.0.0
   https://maven.apache.org/xsd/maven-4.0.0.xsd">
   <modelVersion>4.0.0</modelVersion>
   <parent>
      <groupId>org.springframework.boot</groupId>
      <artifactId>spring-boot-starter-parent</artifactId>
      <version>3.0.4</version>
      <relativePath/> <!-- lookup parent from repository -->
   </parent>
   <groupId>com.knf.dev.demo</groupId>
   <artifactId>spring-boot-gcp-sql-postgresql-crud</artifactId>
   <version>0.0.1-SNAPSHOT</version>
   <name>spring-boot-gcp-sql-postgresql-crud</name>
   <description>Demo project for Spring Boot</description>
   <properties>
      <java.version>17</java.version>
      <spring-cloud-gcp.version>4.1.1</spring-cloud-gcp.version>
      <spring-cloud.version>2022.0.1</spring-cloud.version>
   </properties>
   <dependencies>
      <dependency>
         <groupId>org.springframework.boot</groupId>
         <artifactId>spring-boot-starter-web</artifactId>
      </dependency>
      <dependency>
         <groupId>com.google.cloud</groupId>
         <artifactId>spring-cloud-gcp-starter</artifactId>
      </dependency>
      <!-- Add CloudSQL Starter for PostgreSQL -->
      <dependency>
         <groupId>com.google.cloud</groupId>
         <artifactId>spring-cloud-gcp-starter-sql-postgresql</artifactId>
      </dependency>

      <dependency>
         <groupId>org.springframework.boot</groupId>
         <artifactId>spring-boot-starter-test</artifactId>
         <scope>test</scope>
      </dependency>
   </dependencies>
   <dependencyManagement>
      <dependencies>
         <dependency>
            <groupId>org.springframework.cloud</groupId>
            <artifactId>spring-cloud-dependencies</artifactId>
            <version>${spring-cloud.version}</version>
            <type>pom</type>
            <scope>import</scope>
         </dependency>
         <dependency>
            <groupId>com.google.cloud</groupId>
            <artifactId>spring-cloud-gcp-dependencies</artifactId>
            <version>${spring-cloud-gcp.version}</version>
            <type>pom</type>
            <scope>import</scope>
         </dependency>
      </dependencies>
   </dependencyManagement>

   <build>
      <plugins>
         <plugin>
            <groupId>org.springframework.boot</groupId>
            <artifactId>spring-boot-maven-plugin</artifactId>
         </plugin>
      </plugins>
   </build>

</project>
application.properties
spring.cloud.gcp.sql.database-name=studentdb
spring.cloud.gcp.sql.instance-connection-name=knf-gcp-demo-project-123:us-central1:knf-demo-instance
spring.cloud.gcp.project-id=knf-gcp-demo-project-123
spring.cloud.gcp.credentials.location=classpath:knf-gcp-demo-project-123-9bf47abde11f.json

# Leave empty for root, uncomment and fill out if you specified a user
#spring.datasource.username=

# Uncomment if root password is specified
spring.datasource.password=YourPassword

spring.sql.init.mode=always
server.error.include-message=always
- Specify database name, instance name, project id, credential's location, and datasource password.
- The configuration property spring.sql.init.mode=always means that Spring Boot will automatically generate a database schema, using the schema.sql file that we will create later, each time the server is started.
Note: In this example, we placed service account key JSON file in resources folder (Not recommended in production environment).
More secure way is place JSON in somewhere in server or docker image, then create environment variable "GOOGLE_APPLICATION_CREDENTIALS" and give the location to your JSON FILE.
If your application is running on Google App Engine or Google Compute Engine, in most cases you should omit the "spring.cloud.gcp.credentials.location" property and instead, let Spring Cloud GCP Core Starter find the correct credentials for those environments.
schema.sql
CREATE TABLE IF NOT EXISTS students(
 id serial primary key,
 first_name VARCHAR(40) not null,
 last_name VARCHAR(40) not null,
 email VARCHAR(40) not null
);
CREATE TABLE IF NOT EXISTS students(
id serial primary key,
first_name VARCHAR(40) not null,
last_name VARCHAR(40) not null,
email VARCHAR(40) not null
);
Create Student Model
package com.knf.dev.demo.model;

public class Student {
    private Long id;
    private String firstName;
    private String lastName;
    private String email;

    public Student(Long id, String firstName, String lastName, String email) {
        this.id = id;
        this.firstName = firstName;
        this.lastName = lastName;
        this.email = email;
    }

    public Long getId() {
        return id;
    }

    public void setId(Long id) {
        this.id = id;
    }

    public String getFirstName() {
        return firstName;
    }

    public void setFirstName(String firstName) {
        this.firstName = firstName;
    }

    public String getLastName() {
        return lastName;
    }

    public void setLastName(String lastName) {
        this.lastName = lastName;
    }

    public String getEmail() {
        return email;
    }

    public void setEmail(String email) {
        this.email = email;
    }
}
Create StudentRepository - StudentRepository.java
package com.knf.dev.demo.repository;

import com.knf.dev.demo.model.Student;
import java.util.List;

public interface StudentRepository {

    public Student findById(Long id);

    public List<Student> findAll();

    public int insert(Student student);

    public int update(Student student);

    public int deleteById(Long id);
}
package com.knf.dev.demo.repository;
import com.knf.dev.demo.model.Student;
import java.util.List;
public interface StudentRepository {
public Student findById(Long id);
public List<Student> findAll();
public int insert(Student student);
public int update(Student student);
public int deleteById(Long id);
}
Create StudentRepositoryImpl.java
package com.knf.dev.demo.repository;

import com.knf.dev.demo.exception.ResourceNotFoundException;
import com.knf.dev.demo.model.Student;
import org.springframework.dao.EmptyResultDataAccessException;
import org.springframework.jdbc.core.JdbcTemplate;
import org.springframework.stereotype.Repository;
import java.sql.ResultSet;
import java.sql.SQLException;
import java.util.List;

@Repository
public class StudentRepositoryImpl implements StudentRepository{

    private final JdbcTemplate jdbcTemplate;

    public StudentRepositoryImpl(JdbcTemplate jdbcTemplate) {
        this.jdbcTemplate = jdbcTemplate;
    }

    @Override
    public Student findById(Long id) {

        String sqlQuery = Query.FIND_ONE;
        Student student = null;
        try {
            student = jdbcTemplate.
                    queryForObject(sqlQuery,
                            this::mapRowToStudent, id);
        }catch(EmptyResultDataAccessException e)
        {
           throw new ResourceNotFoundException
                   ("Student not exist with id :" + id);
        }
        return student;
    }

    @Override
    public List<Student> findAll() {

        String sqlQuery = Query.FIND_ALL;

        return jdbcTemplate.
                query(sqlQuery, this::mapRowToStudent);
    }

    @Override
    public int insert(Student student) {

        String sqlQuery = Query.SAVE;

        return jdbcTemplate.update(sqlQuery,
                student.getFirstName(),
                student.getLastName(),
                student.getEmail());
    }

    @Override
    public int update(Student student) {

        String sqlQuery = Query.UPDATE;

        return jdbcTemplate.update(sqlQuery,
                student.getFirstName(),
                student.getLastName(),
                student.getEmail(),
                student.getId());
    }

    @Override
    public int deleteById(Long id) {

        String sqlQuery = Query.DELETE;

        return jdbcTemplate.update(sqlQuery, id);
    }

    private Student mapRowToStudent(ResultSet resultSet, int rowNum)
            throws SQLException {

        Student student = new Student(resultSet.getLong("id"),
                resultSet.getString("first_name"),
                resultSet.getString("last_name"),
                resultSet.getString("email"));

        return student;
    }
}
- JdbcTemplate is a powerful mechanism to connect to the database and execute SQL queries. It internally uses JDBC api, but eliminates a lot of problems of JDBC API.
- The @Repository annotation is a specialization of the @Component annotation which indicates that an annotated class is a "Repository".
Query.java
package com.knf.dev.demo.repository;

public class Query {

    public static final String FIND_ONE =
            "select id, first_name, last_name,"
                + " email from students where id = ?";

    public static final String FIND_ALL =
            "select id, first_name,last_name,"
              + " email from students";

    public static final String SAVE =
            "insert into students(first_name, "
                    + "last_name, email) "
                    + "values (?, ?, ?)";

    public static final String UPDATE =
           "update students set "
              + "first_name = ?, last_name = ?,"
                   + " email = ? " + "where id = ?";

    public static final String DELETE =
          "delete from students where id = ?";
}
ResourceNotFoundException.java
package com.knf.dev.demo.exception;

import org.springframework.http.HttpStatus;
import org.springframework.web.bind.annotation.ResponseStatus;

@ResponseStatus(value = HttpStatus.NOT_FOUND)
public class ResourceNotFoundException extends RuntimeException{

    private static final long serialVersionUID = 1L;

    public ResourceNotFoundException(String message) {
        super(message);
    }
}
Create Student Controller
package com.knf.dev.demo.controller;

import com.knf.dev.demo.model.Student;
import com.knf.dev.demo.repository.StudentRepository;
import org.springframework.beans.factory.annotation.Autowired;
import org.springframework.web.bind.annotation.*;
import java.util.HashMap;
import java.util.List;
import java.util.Map;

@RestController
@RequestMapping("/api/v1")
public class StudentController {

    @Autowired
    private StudentRepository studentRepository;

    // get all students
    @GetMapping("/students")
    public List<Student> getAllStudents()
    {
        return studentRepository.findAll();
    }

    // create student rest API
    @PostMapping("/students")
    public Map<String, Boolean> createStudent(@RequestBody Student student)  {

        Map<String, Boolean> response = new HashMap<>();

        Boolean bool = studentRepository.insert(student) > 0 ?
                response.put("created", Boolean.TRUE) :
                response.put("created", Boolean.FALSE);

        return response;

    }

    // get student by id rest api
    @GetMapping("/students/{id}")
    public Student findStudentById(@PathVariable Long id) {

        Student student = studentRepository.findById(id);
        return student;
    }

   // update student rest api
   @PutMapping("/students/{id}")
   public Map<String, Boolean> updateStudent(@PathVariable Long id,
                           @RequestBody Student studentDetails) {

       studentDetails.setId(id);
       Map<String, Boolean> response = new HashMap<>();

       Boolean bool = studentRepository.update(studentDetails) > 0 ?
               response.put("updated", Boolean.TRUE) :
               response.put("updated", Boolean.FALSE);

      return response;
    }

    // delete student rest api
    @DeleteMapping("/students/{id}")
    public Map<String, Boolean> deleteStudent
               (@PathVariable Long id) {

        Map<String, Boolean> response = new HashMap<>();

        Boolean bool = studentRepository.deleteById(id) > 0 ?
                response.put("deleted", Boolean.TRUE) :
                response.put("deleted", Boolean.FALSE);
        return response;
    }
}
- Spring @RestController annotation is used to create RESTful web services using Spring MVC. Spring RestController takes care of mapping request data to the defined request handler method. Once response body is generated from the handler method, it converts it to JSON response.
- @RequestMapping is used to map web requests onto specific handler classes and/or handler methods. @RequestMapping can be applied to the controller class as well as methods.
- We can use the @Autowired to mark a dependency which Spring is going to resolve and inject.
- @GetMapping annotation for mapping HTTP GET requests onto specific handler methods.
- @PostMapping annotation for mapping HTTP POST requests onto specific handler methods.
- @PutMapping annotation for mapping HTTP PUT requests onto specific handler methods.
- @DeleteMapping annotation for mapping HTTP DELETE requests onto specific handler methods.
- @RequestBody annotation is used to indicating a method parameter should be bind to the body of the HTTP request. Internally, this annotation uses HTTP Message converters to convert the body of HTTP requests to domain objects.
- @PathVariable annotation used on a method argument to bind it to the value of a URI template variable.
Run the application - Application.java
package com.knf.dev.demo;

import org.springframework.boot.SpringApplication;
import org.springframework.boot.autoconfigure.SpringBootApplication;

@SpringBootApplication
public class Application {

   public static void main(String[] args) {
      SpringApplication.run(Application.class, args);
   }

}
Application is the entry point that sets up the Spring Boot application. The @SpringBootApplication annotation enables auto-configuration and component scanning.
package com.knf.dev.demo;
import org.springframework.boot.SpringApplication;
import org.springframework.boot.autoconfigure.SpringBootApplication;
@SpringBootApplication
public class Application {
public static void main(String[] args) {
SpringApplication.run(Application.class, args);
}
}
Step1: Download or clone the source code from GitHub to a local machine - Click here!
Step 2: mvn clean install
Step 3: Run the Spring Boot application - mvn spring-boot:run
OR
Run this Spring boot application from
- IntelliJ IDEA IDE by right click - Run 'Application.main()'
- Eclipse/STS - You can right click the project or the Application.java file and run as java application or Spring boot application.
Add Student:

Update Student:

Fetch all Student:

Get Student by Id:

Delete Student: