Spring Boot, Google Cloud Key Management Service (KMS) - Encryption Decryption Example
In this section, we will learn how to use the Spring Boot on Google Cloud Key Management Service (KMS) integration and how to encrypt and decrypt data using symmetric Cloud KMS keys.

Cloud Key Management Service (Cloud KMS) allows you to create, import, and manage cryptographic keys and perform cryptographic operations in a single centralized cloud service. You can use these keys and perform these operations by using Cloud KMS directly, by using Cloud HSM or Cloud External Key Manager, or by using Customer-Managed Encryption Keys (CMEK) integrations within other Google Cloud services.
Let's begin,
1. Create a GCP Project
First, Sign into the Google console at https://console.cloud.google.com.
You can create a new project by first selecting the project dropdown in the top left and selecting "New Project".

Next, specify your GCP Project name and Project ID.
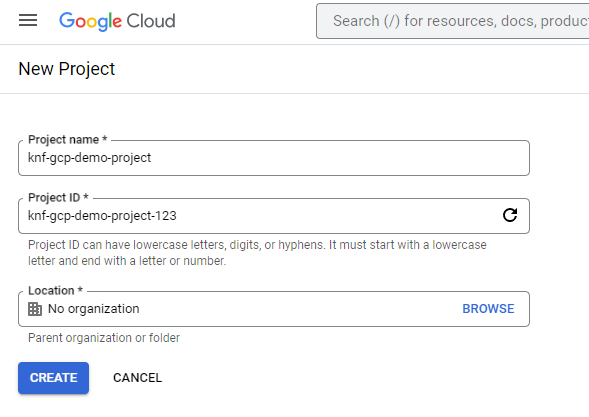
Then Click on the "CREATE" button.
Copy "Project ID" and keep it for future purposes.
2. Enable Cloud KMS Service
From cloud console, search for "Key Management" like below and click on "Key Management" button.

Next, click on "ENABLE" button,

3. Create KMS Key
First, Create a Cloud KMS Key Ring.
Click on "CREATE KEY RING" button,

In Cloud KMS, a Key Ring is a logical collection of cryptographic keys. The Key Ring contains metadata about the keys such as their location. Create a Key Ring named knf-gcp-spring-ring in the global region:

Note "Key ring name" and keep it for future purposes.
Then click on "CREATE" button,
Now we are going to create a Crypto Key named knf-key with the purpose encryption inside the Key Ring we just created.
Click on "CREATE KEY" button,

Then, enter Key name and other information's. Note "Key name" and keep it for future purposes.

Finally click on "CREATE" button.
4. Create a service account key
First choose "IAM & Admin" and then click on "Service accounts".

After that, click on "CREATE SERVICE ACCOUNT".

Then, enter service account details like "Service account name", and "Service account ID" and click on "CREATE AND CONTINUE".

Then, grant basic role Cloud KMS Crypto Operator.


Finally click on "DONE" button.
Then, from "Actions" click on "Manage keys".

Then, click on "Create new key".

Then, choose "Key type" as JSON and click on "CREATE" button.

Service account keys in JSON format will be download. Keep the file safe for future purposes.

5. Creating a simple spring boot web application
First, open the Spring initializr https://start.spring.io/
Then, Provide the Group and Artifact name. We have provided Group name com.knf.dev.demo and Artifact spring-boot-gcp-kms-example. Here I selected the Maven project - language Java 17 - Spring Boot 3.0.4 and add Spring Web, and GCP Support.

Then, click on the Generate button. When we click on the Generate button, it starts packing the project in a .zip(spring-boot-gcp-kms-example) file and downloads the project. Then, Extract the Zip file.
Then, import the project on your favourite IDE.
Final Project directory:

In the pom.xml, add GCP Cloud kms Starter:
<!-- Add Spring Cloud kms Starter -->
<dependency>
   <groupId>com.google.cloud</groupId>
   <artifactId>spring-cloud-gcp-starter-kms</artifactId>
</dependency>
<!-- Add Spring Cloud kms Starter -->
<dependency>
<groupId>com.google.cloud</groupId>
<artifactId>spring-cloud-gcp-starter-kms</artifactId>
</dependency>
Complete pom.xml
<?xml version="1.0" encoding="UTF-8"?>
<project xmlns="http://maven.apache.org/POM/4.0.0"
       xmlns:xsi="http://www.w3.org/2001/XMLSchema-instance"
   xsi:schemaLocation="http://maven.apache.org/POM/4.0.0
   https://maven.apache.org/xsd/maven-4.0.0.xsd">
   <modelVersion>4.0.0</modelVersion>
   <parent>
      <groupId>org.springframework.boot</groupId>
      <artifactId>spring-boot-starter-parent</artifactId>
      <version>3.0.4</version>
      <relativePath/> <!-- lookup parent from repository -->
   </parent>
   <groupId>com.knf.dev.demo</groupId>
   <artifactId>spring-boot-gcp-kms-example</artifactId>
   <version>0.0.1-SNAPSHOT</version>
   <name>spring-boot-gcp-kms-example</name>
   <description>Demo project for Spring Boot</description>
   <properties>
      <java.version>17</java.version>
      <spring-cloud-gcp.version>4.1.2</spring-cloud-gcp.version>
      <spring-cloud.version>2022.0.1</spring-cloud.version>
   </properties>
   <dependencies>
      <dependency>
         <groupId>org.springframework.boot</groupId>
         <artifactId>spring-boot-starter-web</artifactId>
      </dependency>
      <dependency>
         <groupId>com.google.cloud</groupId>
         <artifactId>spring-cloud-gcp-starter</artifactId>
      </dependency>
      <!-- Add Spring Cloud kms Starter -->
      <dependency>
         <groupId>com.google.cloud</groupId>
         <artifactId>spring-cloud-gcp-starter-kms</artifactId>
      </dependency>

      <dependency>
         <groupId>org.springframework.boot</groupId>
         <artifactId>spring-boot-starter-test</artifactId>
         <scope>test</scope>
      </dependency>
   </dependencies>
   <dependencyManagement>
      <dependencies>
         <dependency>
            <groupId>org.springframework.cloud</groupId>
            <artifactId>spring-cloud-dependencies</artifactId>
            <version>${spring-cloud.version}</version>
            <type>pom</type>
            <scope>import</scope>
         </dependency>
         <dependency>
            <groupId>com.google.cloud</groupId>
            <artifactId>spring-cloud-gcp-dependencies</artifactId>
            <version>${spring-cloud-gcp.version}</version>
            <type>pom</type>
            <scope>import</scope>
         </dependency>
      </dependencies>
   </dependencyManagement>

   <build>
      <plugins>
         <plugin>
            <groupId>org.springframework.boot</groupId>
            <artifactId>spring-boot-maven-plugin</artifactId>
         </plugin>
      </plugins>
   </build>

</project>
application.properties
Add the following configuration to application.properties file:
spring.cloud.gcp.project-id=knf-gcp-demo-project-1234567
spring.cloud.gcp.credentials.location=classpath:knf-gcp-demo-project-1234567-e621def839c5.json
Note: In this example, we placed service account key JSON file in resources folder (Not recommended in production environment).
More secure way is place JSON in somewhere in server or docker image, then create environment variable "GOOGLE_APPLICATION_CREDENTIALS" and give the location to your JSON FILE.
If your application is running on Google App Engine or Google Compute Engine, in most cases you should omit the "spring.cloud.gcp.credentials.location" property and instead, let Spring Cloud GCP Core Starter find the correct credentials for those environments.
Create CryptoService.java
package com.knf.dev.demo.service;

public interface CryptoService {

    String encrypt(String keyId,String text);
    String decrypt(String keyId, String encryptedText);
}
Create CryptoServieImpl.java
package com.knf.dev.demo.service;

import com.google.cloud.spring.kms.KmsTemplate;
import org.springframework.beans.factory.annotation.Autowired;
import org.springframework.stereotype.Service;
import java.util.Base64;

@Service
public class CryptoServiceImpl implements CryptoService{

    @Autowired
    private KmsTemplate kmsTemplate;

    @Override
    public String encrypt(String keyId,String text) {

        byte[] encryptedBytes = kmsTemplate.
                encryptText(keyId, text);
        String encryptedText = encodeBase64(encryptedBytes);
        return encryptedText;
    }

    @Override
    public String decrypt(String keyId, String encryptedText) {

        byte[] decryptedBytes = decodeBase64(encryptedText);
        String decrypted = kmsTemplate.
                decryptText(keyId, decryptedBytes);

        return decrypted;
    }

    private String encodeBase64(byte[] bytes) {
        byte[] encoded = Base64.getEncoder().encode(bytes);
        return new String(encoded);
    }

    private byte[] decodeBase64(String encryptedText) {
        byte[] bytes = encryptedText.getBytes();
        return Base64.getDecoder().decode(bytes);
    }
}
Create KmsController.java
package com.knf.dev.demo.controller;

import com.knf.dev.demo.service.CryptoService;
import org.springframework.beans.factory.annotation.Autowired;
import org.springframework.web.bind.annotation.PostMapping;
import org.springframework.web.bind.annotation.RequestParam;
import org.springframework.web.bind.annotation.RestController;

@RestController
public class KmsController {

    @Autowired
    private CryptoService cryptoService;

    @PostMapping("/encrypt")
    public String encrypt(@RequestParam String keyId,
                          @RequestParam String text) {


        return "Encrypted Text= " +
                cryptoService.encrypt(keyId,text);
    }

    @PostMapping("/decrypt")
    public String decrypt(
            @RequestParam String keyId,
            @RequestParam String encryptedText) {

        return "Decrypted Text= " +
                cryptoService.decrypt(keyId,encryptedText);
    }
}
Run the application - Application.java
package com.knf.dev.demo;

import org.springframework.boot.SpringApplication;
import org.springframework.boot.autoconfigure.SpringBootApplication;

@SpringBootApplication
public class Application {

   public static void main(String[] args) {
      SpringApplication.run(Application.class, args);
   }

}
Application is the entry point that sets up the Spring Boot application. The @SpringBootApplication annotation enables auto-configuration and component scanning.
Step1: Download or clone the source code from GitHub to a local machine - Click here!
Step 2: mvn clean install
Step 3: Run the Spring Boot application - mvn spring-boot:run
OR
Run this Spring boot application from
- IntelliJ IDEA IDE by right click - Run 'Application.main()'
- Eclipse/STS - You can right click the project or the Application.java file and run as java application or Spring boot application.
6. Verify API's using Postman
Put "Key ring name/Key name" as the Key Id, that is "knf-gcp-spring-ring/knf-key".
Encrypt Data:

Decrypt Data: