Spring Boot + Google Cloud Pub/Sub Example
In this section, we will learn how to do asynchronous communication using Google Cloud Pub/Sub in combination with Spring Boot and Spring Integration.
We will develop two Spring Boot applications, one producer and one consumer application, which will make use of Spring Integration to send and receive the messages. We will make use of GCP Pub/Sub as our messaging system in the Cloud.
1. Cloud Pub/Sub
Asynchronous Message Service where producer and consumer are decoupled from each other while sending or receiving messages. No need to worry whether consumer might be up or running while producer is sending the message. Cloud Pub/Sub is going to retry sending message until it receives acknowledgement from consumer.
Asynchronous communications, with latencies on the order of 100 milliseconds.
Pub/Sub allows us to distributive events/data in real time.
Highly scalable service. Popular products like Gmail and google search uses Cloud Pub/Sub infrastructure for communications.
It can be configured in either ways Push method or Pull method - either of two message delivery methods. A consumer (subscriber) receives message either by Pub/Sub pushing them to consumer (subscriber) or by the consumer (subscriber) pulling them from the topic.
2. Core concepts
Topic: A named resource to which messages are sent by publishers.
Subscription: A named resource representing the stream of messages from a single, specific topic, to be delivered to the subscribing application.
Message: The combination of data and (optional) attributes that a publisher sends to a topic and is eventually delivered to subscribers.
Publisher (Producer): who sends the message to Topic.
Subscriber (Consumer): who consumes the message from Subscription.
A producer application creates and sends messages to a topic. Consumer applications create a subscription to a topic to receive messages from it.
3. What we will build?
We will develop two Spring Boot applications, one producer and one consumer application, which will make use of Spring Integration to send and receive the messages. We will make use of GCP Pub/Sub as our messaging system in the Cloud.
The following diagram is an overview of the components in our messaging system.

(1) A producer (publisher) application creates a topic in the Pub/Sub service and sends messages to the topic. A message contains a payload and optional attributes that describe the payload content.
(2) The service ensures that published messages are retained on behalf of subscriptions. A published message is retained for a subscription until it is acknowledged by any consumer (subscriber) consuming messages from that subscription.
(3) Pub/Sub forwards messages from a topic to all of its subscriptions, individually.
(4) A consumer (subscriber) receives messages either by Pub/Sub pushing them to the consumer's chosen endpoint, or by the consumer pulling them from the service.
(5) The consumer (subscriber) sends an acknowledgement to the Pub/Sub service for each received message.
(6) The service removes acknowledged messages from the subscription's message queue.
4. Create a GCP Project
First, Sign into the Google console at https://console.cloud.google.com.
You can create a new project by first selecting the project dropdown in the top left and selecting "New Project".

Next, specify your GCP Project name and Project ID.
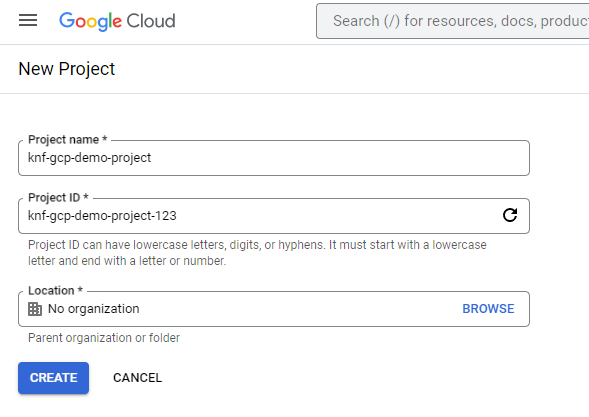
Then Click on the "CREATE" button.
Copy "Project ID" and keep it for future purposes.
5. Create Topic and Subscription
From cloud console, search for "Pub/Sub" like below and click on "Pub/Sub" button.

Next, click on "CREATE TOPIC" button,

After that, enter "Topic ID".

Note "Topic ID" and keep it for future purposes.
Then click on "CREATE TOPIC" button,
Next, click on "CREATE SUBSCRIPTION" button.

Then, enter "Subscription ID", "Select a Cloud Pub/Sub topic" (here we selected knowledgefactoryTopic), and other information's, then click on "CREATE" button.

Note "Subscription ID" and keep it for future purposes.
6. Create a service account key
First choose "IAM & Admin" and then click on "Service accounts".

After that, click on "CREATE SERVICE ACCOUNT".

Then, enter service account details like "Service account name", and "Service account ID" and click on "CREATE AND CONTINUE".

Then, grant basic role Editor.

Finally click on "DONE" button.
Then, from "Actions" click on "Manage keys".

Then, click on "Create new key".

Then, choose "Key type" as JSON and click on "CREATE" button.

Service account keys in JSON format will be download. Keep the file safe for future purposes.

7. Creating spring boot consumer application
First, open the Spring initializr https://start.spring.io/
Then, Provide the Group and Artifact name. We have provided Group name com.knf.dev.demo and Artifact spring-boot-consumer. Here I selected the Maven project - language Java 17 - Spring Boot 3.0.4 and add Spring Web, GCP Messaging, and Spring Integration.

Then, click on the Generate button. When we click on the Generate button, it starts packing the project in a .zip(spring-boot-consumer) file and downloads the project. Then, Extract the Zip file.
Then, import the project on your favourite IDE.
Final Project directory:

Complete pom.xml
<?xml version="1.0" encoding="UTF-8"?>
<project xmlns="http://maven.apache.org/POM/4.0.0"
       xmlns:xsi="http://www.w3.org/2001/XMLSchema-instance"
   xsi:schemaLocation="http://maven.apache.org/POM/4.0.0
   https://maven.apache.org/xsd/maven-4.0.0.xsd">
   <modelVersion>4.0.0</modelVersion>
   <parent>
      <groupId>org.springframework.boot</groupId>
      <artifactId>spring-boot-starter-parent</artifactId>
      <version>3.0.4</version>
      <relativePath/> <!-- lookup parent from repository -->
   </parent>
   <groupId>com.knf.dev.demo</groupId>
   <artifactId>spring-boot-consumer</artifactId>
   <version>0.0.1-SNAPSHOT</version>
   <name>spring-boot-consumer</name>
   <description>Demo project for Spring Boot</description>
   <properties>
      <java.version>17</java.version>
      <spring-cloud-gcp.version>4.1.1</spring-cloud-gcp.version>
      <spring-cloud.version>2022.0.1</spring-cloud.version>
   </properties>
   <dependencies>
      <dependency>
         <groupId>org.springframework.boot</groupId>
         <artifactId>spring-boot-starter-web</artifactId>
      </dependency>
      <dependency>
         <groupId>org.springframework.boot</groupId>
         <artifactId>spring-boot-starter-integration</artifactId>
      </dependency>
      <dependency>
         <groupId>com.google.cloud</groupId>
         <artifactId>spring-cloud-gcp-starter-pubsub</artifactId>
      </dependency>

      <dependency>
         <groupId>org.springframework.boot</groupId>
         <artifactId>spring-boot-starter-test</artifactId>
         <scope>test</scope>
      </dependency>
      <dependency>
         <groupId>org.springframework.integration</groupId>
         <artifactId>spring-integration-test</artifactId>
         <scope>test</scope>
      </dependency>
   </dependencies>
   <dependencyManagement>
      <dependencies>
         <dependency>
            <groupId>org.springframework.cloud</groupId>
            <artifactId>spring-cloud-dependencies</artifactId>
            <version>${spring-cloud.version}</version>
            <type>pom</type>
            <scope>import</scope>
         </dependency>
         <dependency>
            <groupId>com.google.cloud</groupId>
            <artifactId>spring-cloud-gcp-dependencies</artifactId>
            <version>${spring-cloud-gcp.version}</version>
            <type>pom</type>
            <scope>import</scope>
         </dependency>
      </dependencies>
   </dependencyManagement>

   <build>
      <plugins>
         <plugin>
            <groupId>org.springframework.boot</groupId>
            <artifactId>spring-boot-maven-plugin</artifactId>
         </plugin>
      </plugins>
   </build>

</project>
application.properties
spring.cloud.gcp.project-id=knf-gcp-demo-project-123
spring.cloud.gcp.credentials.location=classpath:knf-gcp-demo-project-123-1862d50bc2fd.json
Note: In this example, we placed service account key JSON file in resources folder (Not recommended in production environment).
More secure way is place JSON in somewhere in server or docker image, then create environment variable "GOOGLE_APPLICATION_CREDENTIALS" and give the location to your JSON FILE.
If your application is running on Google App Engine or Google Compute Engine, in most cases you should omit the "spring.cloud.gcp.credentials.location" property and instead, let Spring Cloud GCP Core Starter find the correct credentials for those environments.
Create Config.java
package com.knf.dev.demo;

import com.google.cloud.spring.pubsub.core.PubSubTemplate;
import com.google.cloud.spring.pubsub.integration.inbound.PubSubInboundChannelAdapter;
import org.springframework.beans.factory.annotation.Qualifier;
import org.springframework.context.annotation.Bean;
import org.springframework.context.annotation.Configuration;
import org.springframework.integration.annotation.ServiceActivator;
import org.springframework.integration.channel.DirectChannel;
import org.springframework.messaging.MessageChannel;

@Configuration
public class Config {

    @Bean
    public PubSubInboundChannelAdapter messageChannelAdapter(
            @Qualifier("knfInputChannel") MessageChannel knfInputChannel,
            PubSubTemplate pubSubTemplate) {

        PubSubInboundChannelAdapter adapter =
                new PubSubInboundChannelAdapter(
                        pubSubTemplate, "knowledgefactorySubscription");
        adapter.setOutputChannel(knfInputChannel);

        return adapter;
    }

    @Bean
    public MessageChannel knfInputChannel() {
        return new DirectChannel();
    }


    @ServiceActivator(inputChannel = "knfInputChannel")
    public void messageReceiver(String message) {

        System.out.println("Message arrived! Message: " + message);

    }
}
The example code uses the following Spring beans and Pub/Sub resource:
- A message channel bean named knfInputChannel.
- An inbound channel adapter bean named messageChannelAdapter of type PubSubInboundChannelAdapter.
- A Pub/Sub subscription ID named knowledgefactorySubscription.
The messageChannelAdapter asynchronously pulls messages from knowledgefactorySubscription using a PubSubTemplate and sends the messages to knfInputChannel.
The ServiceActivator bean messageReceiver prints each message arriving in knfInputChannelto the standard output and then acknowledges the message.
Application.java
package com.knf.dev.demo;

import org.springframework.boot.SpringApplication;
import org.springframework.boot.autoconfigure.SpringBootApplication;

@SpringBootApplication
public class Application {

   public static void main(String[] args) {
      SpringApplication.run(Application.class, args);
   }
}
8. Creating spring boot producer application
First, open the Spring initializr https://start.spring.io/
Then, Provide the Group and Artifact name. We have provided Group name com.knf.dev.demo and Artifact spring-boot-producer. Here I selected the Maven project - language Java 17 - Spring Boot 3.0.4 and add Spring Web, GCP Messaging, and Spring Integration.

Then, click on the Generate button. When we click on the Generate button, it starts packing the project in a .zip(spring-boot-producer) file and downloads the project. Then, Extract the Zip file.
Then, import the project on your favourite IDE.
Final Project directory:

Complete pom.xml
<?xml version="1.0" encoding="UTF-8"?>
<project xmlns="http://maven.apache.org/POM/4.0.0"
       xmlns:xsi="http://www.w3.org/2001/XMLSchema-instance"
   xsi:schemaLocation="http://maven.apache.org/POM/4.0.0
   https://maven.apache.org/xsd/maven-4.0.0.xsd">
   <modelVersion>4.0.0</modelVersion>
   <parent>
      <groupId>org.springframework.boot</groupId>
      <artifactId>spring-boot-starter-parent</artifactId>
      <version>3.0.4</version>
      <relativePath/> <!-- lookup parent from repository -->
   </parent>
   <groupId>com.knf.dev.demo</groupId>
   <artifactId>spring-boot-producer</artifactId>
   <version>0.0.1-SNAPSHOT</version>
   <name>spring-boot-producer</name>
   <description>Demo project for Spring Boot</description>
   <properties>
      <java.version>17</java.version>
      <spring-cloud-gcp.version>4.1.1</spring-cloud-gcp.version>
      <spring-cloud.version>2022.0.1</spring-cloud.version>
   </properties>
   <dependencies>
      <dependency>
         <groupId>org.springframework.boot</groupId>
         <artifactId>spring-boot-starter-integration</artifactId>
      </dependency>
      <dependency>
         <groupId>org.springframework.boot</groupId>
         <artifactId>spring-boot-starter-web</artifactId>
      </dependency>
      <dependency>
         <groupId>com.google.cloud</groupId>
         <artifactId>spring-cloud-gcp-starter-pubsub</artifactId>
      </dependency>
      <dependency>
         <groupId>org.springframework.integration</groupId>
         <artifactId>spring-integration-http</artifactId>
      </dependency>

      <dependency>
         <groupId>org.springframework.boot</groupId>
         <artifactId>spring-boot-starter-test</artifactId>
         <scope>test</scope>
      </dependency>
      <dependency>
         <groupId>org.springframework.integration</groupId>
         <artifactId>spring-integration-test</artifactId>
         <scope>test</scope>
      </dependency>
   </dependencies>
   <dependencyManagement>
      <dependencies>
         <dependency>
            <groupId>org.springframework.cloud</groupId>
            <artifactId>spring-cloud-dependencies</artifactId>
            <version>${spring-cloud.version}</version>
            <type>pom</type>
            <scope>import</scope>
         </dependency>
         <dependency>
            <groupId>com.google.cloud</groupId>
            <artifactId>spring-cloud-gcp-dependencies</artifactId>
            <version>${spring-cloud-gcp.version}</version>
            <type>pom</type>
            <scope>import</scope>
         </dependency>
      </dependencies>
   </dependencyManagement>

   <build>
      <plugins>
         <plugin>
            <groupId>org.springframework.boot</groupId>
            <artifactId>spring-boot-maven-plugin</artifactId>
         </plugin>
      </plugins>
   </build>

</project>
application.properties
spring.cloud.gcp.project-id=knf-gcp-demo-project-123
spring.cloud.gcp.credentials.location=classpath:knf-gcp-demo-project-123-1862d50bc2fd.json

server.port=8081
Note: In this example, we placed service account key JSON file in resources folder (Not recommended in production environment).
More secure way is place JSON in somewhere in server or docker image, then create environment variable "GOOGLE_APPLICATION_CREDENTIALS" and give the location to your JSON FILE.
If your application is running on Google App Engine or Google Compute Engine, in most cases you should omit the "spring.cloud.gcp.credentials.location" property and instead, let Spring Cloud GCP Core Starter find the correct credentials for those environments.
Create Config.java
package com.knf.dev.demo;

import com.google.cloud.spring.pubsub.core.PubSubTemplate;
import com.google.cloud.spring.pubsub.integration.outbound.PubSubMessageHandler;
import org.springframework.context.annotation.Bean;
import org.springframework.context.annotation.Configuration;
import org.springframework.integration.annotation.ServiceActivator;
import org.springframework.messaging.MessageHandler;

@Configuration
public class Config {

    @Bean
    @ServiceActivator(inputChannel = "knfOutputChannel")
    public MessageHandler messageSender(PubSubTemplate pubsubTemplate) {

        return new PubSubMessageHandler(
                pubsubTemplate, "knowledgefactoryTopic");
    }
}
The example code uses the following Spring beans and Pub/Sub resource:
- A message channel bean named knfOutputChannel.
- An outbound channel adapter bean named messageSender of type PubSubMessageHandler.
- A Pub/Sub topic ID named knowledgefactoryTopic.
Create PubsubOutboundGateway.java
package com.knf.dev.demo;

import org.springframework.integration.annotation.MessagingGateway;

@MessagingGateway(defaultRequestChannel = "knfOutputChannel")
public interface PubsubOutboundGateway {

      void sendToPubsub(String text);
   }
Create Message Controller
package com.knf.dev.demo;

import org.springframework.beans.factory.annotation.Autowired;
import org.springframework.web.bind.annotation.PostMapping;
import org.springframework.web.bind.annotation.RequestParam;
import org.springframework.web.bind.annotation.RestController;

@RestController
public class MessageController {

    @Autowired
    private PubsubOutboundGateway messagingGateway;

    @PostMapping("/postMessage")
    public String publishMessage(@RequestParam("message") String message) {

        messagingGateway.sendToPubsub(message);
        return "Message was sent successfully";
    }

}
The controller will receive a parameter message and send its contents via the Messaging Gateway to the Spring Channel.
Application.java
package com.knf.dev.demo;

import org.springframework.boot.SpringApplication;
import org.springframework.boot.autoconfigure.SpringBootApplication;

@SpringBootApplication
public class Application {

   public static void main(String[] args) {
      SpringApplication.run(Application.class, args);
   }

}
9. Verify our system is working as expected
Run both the producer and the consumer application:
Run the Spring Boot application - mvn spring-boot:run
OR
Run this Spring boot application from
- IntelliJ IDEA IDE by right click - Run 'Application.main()'
- Eclipse/STS - You can right click the project or the Application.java file and run as java application or Spring boot application.
Run the Spring Boot application - mvn spring-boot:run
OR
Run this Spring boot application from
- IntelliJ IDEA IDE by right click - Run 'Application.main()'
- Eclipse/STS - You can right click the project or the Application.java file and run as java application or Spring boot application.
Open a Postman or any other tool and send a message to the producer:

The console of the consumer application now prints: