Spring Boot + RabbitMQ - Producer and Consumer Example
In this section, we will learn how to do asynchronous communication using RabbitMQ in Spring Boot application.
We will develop two Spring Boot applications, one producer and one consumer application, then we will learn how to use RabbitMQ broker in the Spring boot application to send and receive messages between the Producer and the Consumer.
1. What is Message Broker?
2. What is RabbitMQ?
RabbitMQ is a message broker that acts as an intermediary platform where different applications can send and receive binary data or messages. RabbitMQ originally implements the Advanced Message Queuing Protocol (AMQP). But now RabbitMQ also supports several other API protocols such as STOMP, MQTT, and HTTP.
The advantage of RabbitMQ is that the producer of the message sends it to the queue. At this point, it is the messaging broker that takes care of it, so the producer can dedicate himself to a new task without having to wait for the message to reach the consumer. With this system, the message remains in the queue and the consumer can pick it up later. By then, the producer may already be engaged in a new task. That is, it is an asynchronous communication: producers and consumers do not have to go at the same pace.
3. Spring AMQP
The Spring AMQP project applies core Spring concepts to the development of AMQP-based messaging solutions. It provides a "template" as a high-level abstraction for sending and receiving messages.
The Spring AMQP project consists of two parts; spring-amqp is the base abstraction, and spring-rabbit is the RabbitMQ implementation.
4. What we will build?
We will develop two Spring Boot applications, one producer and one consumer application, then we will learn how to use RabbitMQ broker in the Spring boot application to send and receive messages between the Producer and the Consumer.
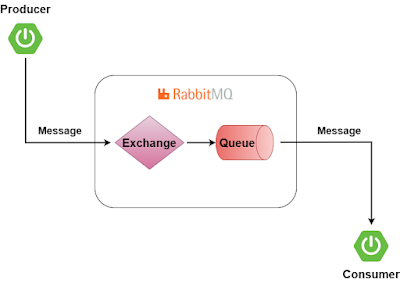
The following diagram is an overview of the components in our messaging system.
Four stations participate in the transmission of the messages:
- Producer: creates the messages
- Exchanger: delivers messages
- Queue: stores messages
- Consumer: processes the message
The producer publishes a message, but does not send it directly to the consumer, but delivers it to the exchanger. In this station, the messages are distributed through the queue, which serve as a reading point for a message for a consumer. Both the exchanger and the queues are part of RabbitMQ and are managed by the software.
5. Install RabbitMQ using Docker
Assuming the Docker Desktop has been installed, we use the following command to pull a RabbitMQ Docker image from DockerHub..
docker pull rabbitmq:3.11-management
After the Docker image is downloaded and saved, we can start a RabbitMQ container using the following command:
docker run --rm -it -p 15672:15672 -p 5672:5672 rabbitmq:3.11-management
In the command above, port 5672 is used for the RabbitMQ client connections, and port 15672 is for the RabbitMQ management website.
Then, open a browser window and use the URL http://localhost:15672 to visit the RabbitMQ management website.
We can use default Username=guest and Password=guest to log into the RabbitMQ management website.
6. Creating spring boot consumer application
First, open the Spring initializr https://start.spring.io/
Then, Provide the Group and Artifact name. We have provided Group name com.knf.dev.demo and Artifact consumer. Here I selected the Maven project - language Java 17 - Spring Boot 3.0.5 and add Spring Web, and Spring for RabbitMQ.
Then, click on the Generate button. When we click on the Generate button, it starts packing the project in a .zip(consumer) file and downloads the project. Then, Extract the Zip file.
Then, import the project on your favourite IDE.
Final Project directory:
Complete pom.xml
<?xml version="1.0" encoding="UTF-8"?>
<project xmlns="http://maven.apache.org/POM/4.0.0"
       xmlns:xsi="http://www.w3.org/2001/XMLSchema-instance"
   xsi:schemaLocation="http://maven.apache.org/POM/4.0.0
   https://maven.apache.org/xsd/maven-4.0.0.xsd">
   <modelVersion>4.0.0</modelVersion>
   <parent>
      <groupId>org.springframework.boot</groupId>
      <artifactId>spring-boot-starter-parent</artifactId>
      <version>3.0.5</version>
      <relativePath/> <!-- lookup parent from repository -->
   </parent>
   <groupId>com.knf.dev.demo</groupId>
   <artifactId>consumer</artifactId>
   <version>0.0.1-SNAPSHOT</version>
   <name>consumer</name>
   <description>Demo project for Spring Boot</description>
   <properties>
      <java.version>17</java.version>
   </properties>
   <dependencies>
      <dependency>
         <groupId>org.springframework.boot</groupId>
         <artifactId>spring-boot-starter-amqp</artifactId>
      </dependency>
      <dependency>
         <groupId>org.springframework.boot</groupId>
         <artifactId>spring-boot-starter-web</artifactId>
      </dependency>

      <dependency>
         <groupId>org.springframework.boot</groupId>
         <artifactId>spring-boot-starter-test</artifactId>
         <scope>test</scope>
      </dependency>
      <dependency>
         <groupId>org.springframework.amqp</groupId>
         <artifactId>spring-rabbit-test</artifactId>
         <scope>test</scope>
      </dependency>
   </dependencies>

   <build>
      <plugins>
         <plugin>
            <groupId>org.springframework.boot</groupId>
            <artifactId>spring-boot-maven-plugin</artifactId>
         </plugin>
      </plugins>
   </build>

</project>
application.properties
You can then configure rabbitmq properties according to the Spring Boot Documentation - scroll down to the rabbitmq properties...
Then, specify queue name, and port.
spring.rabbitmq.host=localhost
spring.rabbitmq.port=5672
spring.rabbitmq.username=guest
spring.rabbitmq.password=guest

rabbitmq.queue.name=knfQueue
server.port=9080
Create RabbitMQ Consumer
The Consumer app will listen the queue and consume the messages from the queue. Also consumed messages will be printed to console.
package com.knf.dev.demo.consumer;

import org.springframework.amqp.rabbit.annotation.RabbitListener;
import org.springframework.stereotype.Service;

@Service
public class RabbitMQConsumer {


    @RabbitListener(queues = {"${rabbitmq.queue.name}"})
    public void consume(String message){

        System.out.println("Message arrived! Message: " + message);
    }
}
Application.java
package com.knf.dev.demo;

import org.springframework.boot.SpringApplication;
import org.springframework.boot.autoconfigure.SpringBootApplication;

@SpringBootApplication
public class Application {

   public static void main(String[] args) {
      SpringApplication.run(Application.class, args);
   }

}
7. Creating spring boot producer application
First, open the Spring initializr https://start.spring.io/
Then, Provide the Group and Artifact name. We have provided Group name com.knf.dev.demo and Artifact producer. Here I selected the Maven project - language Java 17 - Spring Boot 3.0.5 and add Spring Web, and Spring for RabbitMQ.
Then, click on the Generate button. When we click on the Generate button, it starts packing the project in a .zip(producer) file and downloads the project. Then, Extract the Zip file.
Then, import the project on your favourite IDE.
Final Project directory:
Complete pom.xml
<?xml version="1.0" encoding="UTF-8"?>
<project xmlns="http://maven.apache.org/POM/4.0.0"
       xmlns:xsi="http://www.w3.org/2001/XMLSchema-instance"
   xsi:schemaLocation="http://maven.apache.org/POM/4.0.0
   https://maven.apache.org/xsd/maven-4.0.0.xsd">
   <modelVersion>4.0.0</modelVersion>
   <parent>
      <groupId>org.springframework.boot</groupId>
      <artifactId>spring-boot-starter-parent</artifactId>
      <version>3.0.5</version>
      <relativePath/> <!-- lookup parent from repository -->
   </parent>
   <groupId>com.knf.dev.demo</groupId>
   <artifactId>producer</artifactId>
   <version>0.0.1-SNAPSHOT</version>
   <name>producer</name>
   <description>Demo project for Spring Boot</description>
   <properties>
      <java.version>17</java.version>
   </properties>
   <dependencies>
      <dependency>
         <groupId>org.springframework.boot</groupId>
         <artifactId>spring-boot-starter-amqp</artifactId>
      </dependency>
      <dependency>
         <groupId>org.springframework.boot</groupId>
         <artifactId>spring-boot-starter-web</artifactId>
      </dependency>

      <dependency>
         <groupId>org.springframework.boot</groupId>
         <artifactId>spring-boot-starter-test</artifactId>
         <scope>test</scope>
      </dependency>
      <dependency>
         <groupId>org.springframework.amqp</groupId>
         <artifactId>spring-rabbit-test</artifactId>
         <scope>test</scope>
      </dependency>
   </dependencies>

   <build>
      <plugins>
         <plugin>
            <groupId>org.springframework.boot</groupId>
            <artifactId>spring-boot-maven-plugin</artifactId>
         </plugin>
      </plugins>
   </build>

</project>
application.properties
Add the following configuration to application.properties file:
spring.rabbitmq.host=localhost
spring.rabbitmq.port=5672
spring.rabbitmq.username=guest
spring.rabbitmq.password=guest

rabbitmq.queue.name=knfQueue
rabbitmq.exchange.name=knfTopicExchange
rabbitmq.routing.key=knfRoutingKey

server.port=8081
RabbitMQConfig.java
Firstly, we will implement the RabbitMQConfig class. It will handle the configuration of the RabbitMq like below.
package com.knf.dev.demo.config;

import org.springframework.amqp.core.*;
import org.springframework.amqp.rabbit.connection.ConnectionFactory;
import org.springframework.amqp.rabbit.listener.SimpleMessageListenerContainer;
import org.springframework.beans.factory.annotation.Value;
import org.springframework.context.annotation.Bean;
import org.springframework.context.annotation.Configuration;

@Configuration
public class RabbitMQConfig {

    @Value("${rabbitmq.queue.name}")
    private String queue;

    @Value("${rabbitmq.exchange.name}")
    private String exchange;

    @Value("${rabbitmq.routing.key}")
    private String routingKey;

    @Bean
    Queue createQueue() {

        return new Queue(queue);
    }

    @Bean
    TopicExchange exchange() {

        return new TopicExchange(exchange);
    }

    @Bean
    Binding binding(Queue queue, TopicExchange exchange) {

        return BindingBuilder.bind(queue).
                to(exchange).with(routingKey);
    }

    @Bean
    SimpleMessageListenerContainer container(
            ConnectionFactory connectionFactory) {

        SimpleMessageListenerContainer container =
                new SimpleMessageListenerContainer();
        container.setConnectionFactory(connectionFactory);

        return container;
    }
}
Create RabbitMQ Producer
We use RabbitTemplate to convert and send a message using RabbitMQ.
package com.knf.dev.demo.producer;


import org.springframework.amqp.rabbit.core.RabbitTemplate;
import org.springframework.beans.factory.annotation.Autowired;
import org.springframework.beans.factory.annotation.Value;
import org.springframework.stereotype.Service;

@Service
public class RabbitMQProducer {

    @Value("${rabbitmq.exchange.name}")
    private String exchange;

    @Value("${rabbitmq.routing.key}")
    private String routingKey;

    @Autowired
    private RabbitTemplate rabbitTemplate;


    public void sendMessage(String message){

        rabbitTemplate.convertAndSend(
                exchange, routingKey, message);
    }
}
Create MessageController
package com.knf.dev.demo.controller;

import com.knf.dev.demo.producer.RabbitMQProducer;
import org.springframework.beans.factory.annotation.Autowired;
import org.springframework.web.bind.annotation.PostMapping;
import org.springframework.web.bind.annotation.RequestParam;
import org.springframework.web.bind.annotation.RestController;

@RestController
public class MessageController {

    @Autowired
    private RabbitMQProducer rabbitMQProducer;

    @PostMapping("/postMessage")
    public String publishMessage(
            @RequestParam("message") String message) {

        rabbitMQProducer.sendMessage(message);
        return "Message was sent successfully";
    }
}
Application.java
package com.knf.dev.demo;

import org.springframework.boot.SpringApplication;
import org.springframework.boot.autoconfigure.SpringBootApplication;

@SpringBootApplication
public class Application {

   public static void main(String[] args) {
      SpringApplication.run(Application.class, args);
   }

}
8. Verify our system is working as expected
First start the producer application, then start the consumer application:
Run the Spring Boot application - mvn spring-boot:run
OR
Run this Spring boot application from
- IntelliJ IDEA IDE by right click - Run 'Application.main()'
- Eclipse/STS - You can right click the project or the Application.java file and run as java application or Spring boot application.
Run the Spring Boot application - mvn spring-boot:run
OR
Run this Spring boot application from
- IntelliJ IDEA IDE by right click - Run 'Application.main()'
- Eclipse/STS - You can right click the project or the Application.java file and run as java application or Spring boot application.
Open a Postman or any other tool and send a message to the producer:
The console of the consumer application now prints:


Comments
Post a Comment