Posts

Build a CRUD API with Spring Boot and GraphQL

Image
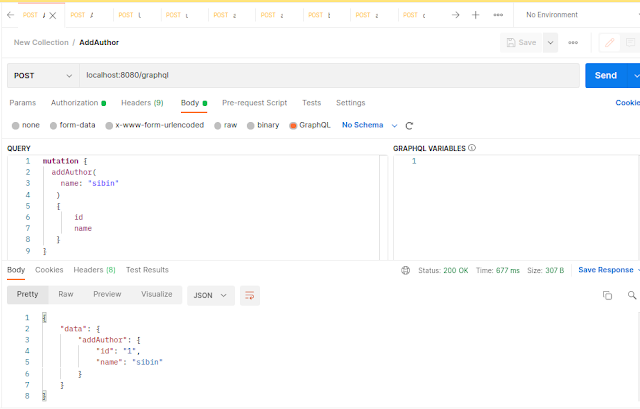
Hello everyone, today we will learn how to build CRUD API using Spring Boot, GraphQL, H2DB and Spring Data JPA. GraphQL is a specification for how to talk with an API. It's typically used over HTTP where the key conception is to POST a "query" to an HTTP endpoint, instead of hitting different HTTP endpoints for different resources. GraphQL is designed for developers of web/mobile apps to be able to make API calls to fetch precisely the data they require from their backend APIs.More Info  https://graphql.org/ We have two data models: Author and Book. So each book must belong to an author and an author may have multiple books under it. So Book will have a many-to-one relationship with Author. For book and author, we will perform Create, Read, Update and Delete operations using GraphQL APIs.  You can download the complete source code from our GitHub repository. CRUD GraphQL APIs: Create Author: Create Book: Update Author: Update Book: Read all Books: Read all Authors: Read

JHipster: Micronaut + Angular + SQL Database CRUD example

Image
Hello everyone, today we will learn how to generate a  Monolithic Full-stack web application  that is a basic Employee Management Application using JHipster. Technologies used:  Micronaut, Angular, H2DB, Maven. User Interface JHipster is an open-source application development platform to quickly generate, develop, & deploy modern web applications & microservice architectures using Angular or React or Vue and Spring Boot or Micronaut Frameworks. Micronaut is a modern, JVM-predicated, full-stack Java framework designed for building modular, facilely testable JVM applications with support for Java, Kotlin and the Groovy language. JHipster Micronaut Environment Setup Step 1 :  Install Java 11,  click here Step 2 : Install Node.js,  click here Step 3 : Install JHipster using the following command npm install -g generator-jhipster@6.10.5 or yarn global add generator-jhipster@6.10.5 or Download  the JHipster Docker image,  click here Step 4(Optional) :  Install  Maven  or  Gradle  d