Spring Boot + Google Cloud Vision Example
In this section, we will take a look at how to integrate Google Cloud Vision with Spring Boot.
We will do following experiments with Google Cloud Vision & Spring Boot.
- Detect Faces from an Image
- Extract Text from an Image
- Recognize Landmark from an Image
- Extract Text from a PDF
- Retrieve Labels from an Image

1. Create a GCP Project
First, Sign into the Google console at https://console.cloud.google.com.
You can create a new project by first selecting the project dropdown in the top left and selecting "New Project".

Next, specify your GCP Project name and Project ID.
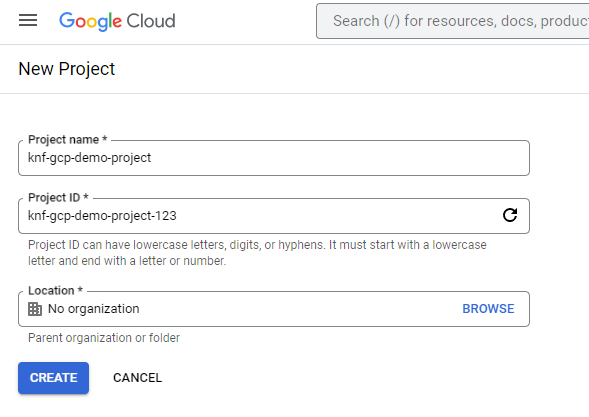
Then Click on the "CREATE" button.
Copy "Project ID" and keep it for future purposes.
2. Enable Cloud Vision API
From cloud console, search for "Cloud Vision API" like below and click on "Cloud Vision API" button.

Next, click on "ENABLE" button,

3. Create a service account key
First choose "IAM & Admin" and then click on "Service accounts".

After that, click on "CREATE SERVICE ACCOUNT".

Then, enter service account details like "Service account name", and "Service account ID" and click on "CREATE AND CONTINUE".

Then, grant basic role Editor.

Finally click on "DONE" button.
Then, from "Actions" click on "Manage keys".

Then, click on "Create new key".

Then, choose "Key type" as JSON and click on "CREATE" button.

Service account keys in JSON format will be download. Keep the file safe for future purposes.

4. Creating a simple spring boot web application
First, open the Spring initializr https://start.spring.io/
Then, Provide the Group and Artifact name. We have provided Group name com.knf.dev.demo and Artifact spring-boot-gcp-vision-api-example. Here I selected the Maven project - language Java 17 - Spring Boot 3.0.4 and add Spring Web, and GCP Support.

Then, click on the Generate button. When we click on the Generate button, it starts packing the project in a .zip(spring-boot-gcp-vision-api-example) file and downloads the project. Then, Extract the Zip file.
Then, import the project on your favourite IDE.
Final Project directory:

In the pom.xml, add Cloud Vision Starter:
<dependency>
   <groupId>com.google.cloud</groupId>
   <artifactId>spring-cloud-gcp-starter-vision</artifactId>
</dependency>
Complete pom.xml
<?xml version="1.0" encoding="UTF-8"?>
<project xmlns="http://maven.apache.org/POM/4.0.0"
       xmlns:xsi="http://www.w3.org/2001/XMLSchema-instance"
   xsi:schemaLocation="http://maven.apache.org/POM/4.0.0
   https://maven.apache.org/xsd/maven-4.0.0.xsd">
   <modelVersion>4.0.0</modelVersion>
   <parent>
      <groupId>org.springframework.boot</groupId>
      <artifactId>spring-boot-starter-parent</artifactId>
      <version>3.0.4</version>
      <relativePath/> <!-- lookup parent from repository -->
   </parent>
   <groupId>com.knf.dev.demo</groupId>
   <artifactId>spring-boot-gcp-vision-api-example</artifactId>
   <version>0.0.1-SNAPSHOT</version>
   <name>spring-boot-gcp-vision-api-example</name>
   <description>Demo project for Spring Boot</description>
   <properties>
      <java.version>17</java.version>
      <spring-cloud-gcp.version>4.1.2</spring-cloud-gcp.version>
      <spring-cloud.version>2022.0.1</spring-cloud.version>
   </properties>
   <dependencies>
      <dependency>
         <groupId>org.springframework.boot</groupId>
         <artifactId>spring-boot-starter-web</artifactId>
      </dependency>
      <dependency>
         <groupId>com.google.cloud</groupId>
         <artifactId>spring-cloud-gcp-starter</artifactId>
      </dependency>
      <dependency>
         <groupId>com.google.cloud</groupId>
         <artifactId>spring-cloud-gcp-starter-vision</artifactId>
      </dependency>

      <dependency>
         <groupId>org.springframework.boot</groupId>
         <artifactId>spring-boot-starter-test</artifactId>
         <scope>test</scope>
      </dependency>
   </dependencies>
   <dependencyManagement>
      <dependencies>
         <dependency>
            <groupId>org.springframework.cloud</groupId>
            <artifactId>spring-cloud-dependencies</artifactId>
            <version>${spring-cloud.version}</version>
            <type>pom</type>
            <scope>import</scope>
         </dependency>
         <dependency>
            <groupId>com.google.cloud</groupId>
            <artifactId>spring-cloud-gcp-dependencies</artifactId>
            <version>${spring-cloud-gcp.version}</version>
            <type>pom</type>
            <scope>import</scope>
         </dependency>
      </dependencies>
   </dependencyManagement>

   <build>
      <plugins>
         <plugin>
            <groupId>org.springframework.boot</groupId>
            <artifactId>spring-boot-maven-plugin</artifactId>
         </plugin>
      </plugins>
   </build>

</project>
application.properties
spring.cloud.gcp.project-id=knf-gcp-demo-project-123
spring.cloud.gcp.credentials.location=classpath:knf-gcp-demo-project-123-1862d50bc2fd.json

spring.servlet.multipart.max-file-size=10MB
spring.servlet.multipart.max-request-size=10MB
Note: In this example, we placed service account key JSON file in resources folder (Not recommended in production environment).
More secure way is place JSON in somewhere in server or docker image, then create environment variable "GOOGLE_APPLICATION_CREDENTIALS" and give the location to your JSON FILE.
If your application is running on Google App Engine or Google Compute Engine, in most cases you should omit the "spring.cloud.gcp.credentials.location" property and instead, let Spring Cloud GCP Core Starter find the correct credentials for those environments.
Create VisionService.java
package com.knf.dev.demo.service;

import org.springframework.web.multipart.MultipartFile;

import java.io.IOException;
import java.util.List;

public interface VisionService {

    String extractTextFromImage(MultipartFile file);

    String getLandmarkFromImage(MultipartFile file);

    String detectLabelFromImage(MultipartFile file);

    List<String> extractTextFromPdf(MultipartFile file);

    byte [] detectFaceFromImage(MultipartFile file) throws IOException;

}
Create VisionServiceImpl.java
package com.knf.dev.demo.service;

import com.google.cloud.spring.vision.CloudVisionTemplate;
import com.google.cloud.vision.v1.AnnotateImageResponse;
import com.google.cloud.vision.v1.FaceAnnotation;
import com.google.cloud.vision.v1.Feature;
import com.google.cloud.vision.v1.Vertex;
import org.springframework.beans.factory.annotation.Autowired;
import org.springframework.core.io.Resource;
import org.springframework.core.io.ResourceLoader;
import org.springframework.stereotype.Service;
import org.springframework.web.multipart.MultipartFile;

import javax.imageio.ImageIO;
import java.awt.*;
import java.awt.image.BufferedImage;
import java.io.ByteArrayOutputStream;
import java.io.IOException;
import java.nio.file.Path;
import java.util.List;

@Service
public class VisionServiceImpl implements VisionService{

    @Autowired
    private CloudVisionTemplate cloudVisionTemplate;

    @Autowired
    private ResourceLoader resourceLoader;

    @Override
    public String extractTextFromImage(MultipartFile file) {

        String textFromImage = cloudVisionTemplate.
                extractTextFromImage(file.getResource());

        return textFromImage;
    }

    @Override
    public String getLandmarkFromImage(MultipartFile file) {

        AnnotateImageResponse response =
                cloudVisionTemplate.analyzeImage(file.getResource(),
                        Feature.Type.LANDMARK_DETECTION);

        return response.getLandmarkAnnotationsList().toString();
    }

    @Override
    public String detectLabelFromImage(MultipartFile file) {

        AnnotateImageResponse response =
                cloudVisionTemplate.analyzeImage(
                        file.getResource(), Feature.Type.LABEL_DETECTION);

        return response.getLabelAnnotationsList().toString();
    }

    @Override
    public List<String> extractTextFromPdf(MultipartFile file) {

        List<String> texts =
                cloudVisionTemplate.extractTextFromPdf(file.getResource());

        return texts;
    }

    @Override
    public byte[] detectFaceFromImage(MultipartFile file)
            throws IOException {

        AnnotateImageResponse response = cloudVisionTemplate.analyzeImage(
                file.getResource(), Feature.Type.FACE_DETECTION);
        Resource outputImageResource = resourceLoader.
                getResource("file:src/main/resources/output.jpg");

        byte [] image = writeWithFaces(file,
                outputImageResource.getFile().toPath(),
                   response.getFaceAnnotationsList());

        return image;
    }

    private static byte[] writeWithFaces(MultipartFile file,
                  Path outputPath, List<FaceAnnotation> faces)
                        throws IOException {

        BufferedImage img = ImageIO.read(file.getInputStream());
        annotateWithFaces(img, faces);

        //Write file to resource folder, check resources folder
        ImageIO.write(img, "jpg", outputPath.toFile());

        //And
        ByteArrayOutputStream baos = new ByteArrayOutputStream();
        ImageIO.write(img, "jpg", baos);
        //BufferedImage to byte array
        byte[] image = baos.toByteArray();

        return image;
    }


    public static void annotateWithFaces(BufferedImage img,
                          List<FaceAnnotation> faces) {

        for (FaceAnnotation face : faces) {
            annotateWithFace(img, face);
        }
    }


    private static void annotateWithFace(BufferedImage img,
                                FaceAnnotation face) {

        Graphics2D gfx = img.createGraphics();
        Polygon poly = new Polygon();
        for (Vertex vertex : face.getFdBoundingPoly().getVerticesList()) {
            poly.addPoint(vertex.getX(), vertex.getY());
        }
        gfx.setStroke(new BasicStroke(5));
        gfx.setColor(new Color(0xFFFF00));
        gfx.draw(poly);
    }
}
- In VisionServiceImpl we inject the CloudVisionTemplate which we will use to access the Cloud Vision API.
- extractTextFromImage method is used to extract text from the Image.
- getLandmarkFromImage method is used to detect landmark from the Image. The CloudVisionTemplate has an analyzeImage method, which requires the image and the information we want to retrieve from Cloud Vision as input parameters. In order to retrieve landmark from the Image, we do so by means of Feature.Type.LANDMARK_DETECTION. From the response, we can retrieve the results with the getLabelAnnotationsList method.
- detectLabelFromImage method is used to detect label from the Image. In order to retrieve label from the Image, we used Feature.Type.LABEL_DETECTION.
- extractTextFromPdf method is used to extract text from PDF.
- detectFaceFromImage method is used to detect faces from the Image. The only thing we change is the Feature.Type.FACE_DETECTION. In order to retrieve the results, we invoke the getFaceAnnotationsList method.
Create Vision Controller
package com.knf.dev.demo.controller;

import com.knf.dev.demo.service.VisionService;
import org.springframework.beans.factory.annotation.Autowired;
import org.springframework.http.MediaType;
import org.springframework.http.ResponseEntity;
import org.springframework.web.bind.annotation.PostMapping;
import org.springframework.web.bind.annotation.RequestParam;
import org.springframework.web.bind.annotation.RestController;
import org.springframework.web.multipart.MultipartFile;

import java.io.IOException;
import java.util.List;

@RestController
public class VisionController {

    @Autowired
    private VisionService visionService;

    //Extract the text in an image
    @PostMapping("/extractTextFromImage")
    public String extractTextFromImage(
            @RequestParam MultipartFile file) {

        return visionService.extractTextFromImage(file);

    }

    //Get landmark from Image
    @PostMapping("/getLandmarkFromImage")
    public String getLandmarkFromImage(
            @RequestParam MultipartFile file) {

        return visionService.getLandmarkFromImage(file);

    }

    //Detect label from image
    @PostMapping("/detectLabelFromImage")
    public String detectLabelFromImage(
            @RequestParam MultipartFile file) {

        return visionService.detectLabelFromImage(file);
    }

    //Extract the text in a pdf
    @PostMapping("/extractTextFromPdf")
    public List<String> extractTextFromPdf(
            @RequestParam MultipartFile file) {

        return visionService.extractTextFromPdf(file);
    }

    //Detect face from Image
    @PostMapping("/detectFaceFromImage")
    public ResponseEntity<byte[]> detectFaceFromImage(
            @RequestParam MultipartFile file) throws IOException {

        return ResponseEntity.ok().contentType(MediaType.IMAGE_JPEG).
                body(visionService.detectFaceFromImage(file));
    }
}
Run the application - Application.java
package com.knf.dev.demo;

import org.springframework.boot.SpringApplication;
import org.springframework.boot.autoconfigure.SpringBootApplication;

@SpringBootApplication
public class Application {

   public static void main(String[] args) {
      SpringApplication.run(Application.class, args);
   }

}
Application is the entry point that sets up the Spring Boot application. The @SpringBootApplication annotation enables auto-configuration and component scanning.
Step1: Download or clone the source code from GitHub to a local machine - Click here!
Step 2: mvn clean install
Step 3: Run the Spring Boot application - mvn spring-boot:run
OR
Run this Spring boot application from
- IntelliJ IDEA IDE by right click - Run 'Application.main()'
- Eclipse/STS - You can right click the project or the Application.java file and run as java application or Spring boot application.
Experiment 1: Detect Faces from an Image
We will use the following image for this experiment.

Test the API using Postman:

Experiment 2: Extract Text from an Image
We will use the following image for this experiment.

Test the API using Postman:

Experiment 3: Recognize Landmark from an Image
We are using Sydney Opera House for this experiment.

Test the API using Postman:

Experiment 4: Retrieve Labels from an Image
We will use the following image for this experiment.

Test the API using Postman:

Experiment 5: Extract Text from a PDF
Attach a PDF file and test the API using Postman: