Spring Boot 3, Google Cloud Trace - Distributed tracing example
In this section, we will create 2 simple services (customer & product) and add distributed tracing with Micrometer Tracing, and use Spring Cloud GCP to forward the trace information to Google Cloud Trace.

Distributed tracing, also known as distributed request tracing, is a method of monitoring and observing service requests in applications built on a microservices architecture. When we have chained service to service calls, from customer to product, it's important to understand that the calls were successful and also the latency at every step.
Starting from Spring Boot 3, the old Spring Cloud Sleuth solution for tracing in Spring Boot is replaced with the new Micrometer Tracing library.
Google Cloud Platform has Cloud Trace, which is a managed service that allows us to store trace data.
In this example we will use Spring Cloud GCP Trace, which smoothly integrates with Micrometer Tracing and forwards the trace data directly to Google Cloud Trace.
Let's begin,
1. Creating a simple 'customer' service web application
First, open the Spring initializr https://start.spring.io/
Then, Provide the Group and Artifact name. We have provided Group name com.knf.dev.demo and Artifact customer. Here I selected the Maven project - language Java 17 - Spring Boot 3.0.4 and add Spring web dependency, GCP Support, and Distributed Tracing.

Then, click on the Generate button. When we click on the Generate button, it starts packing the project in a .zip(customer) file and downloads the project. Then, Extract the Zip file.
Then, import the project on your favourite IDE.
Final Project directory:

In the pom.xml, add Cloud Trace Starter:
<!-- Add Cloud Trace Starter -->
<dependency>
   <groupId>com.google.cloud</groupId>
   <artifactId>spring-cloud-gcp-starter-trace</artifactId>
</dependency>
<!-- Add Cloud Trace Starter -->
<dependency>
<groupId>com.google.cloud</groupId>
<artifactId>spring-cloud-gcp-starter-trace</artifactId>
</dependency>
Complete pom.xml
<?xml version="1.0" encoding="UTF-8"?>
<project xmlns="http://maven.apache.org/POM/4.0.0"
       xmlns:xsi="http://www.w3.org/2001/XMLSchema-instance"
   xsi:schemaLocation="http://maven.apache.org/POM/4.0.0
   https://maven.apache.org/xsd/maven-4.0.0.xsd">
   <modelVersion>4.0.0</modelVersion>
   <parent>
      <groupId>org.springframework.boot</groupId>
      <artifactId>spring-boot-starter-parent</artifactId>
      <version>3.0.4</version>
      <relativePath/> <!-- lookup parent from repository -->
   </parent>
   <groupId>com.example</groupId>
   <artifactId>customer</artifactId>
   <version>0.0.1-SNAPSHOT</version>
   <name>customer</name>
   <description>Demo project for Spring Boot</description>
   <properties>
      <java.version>17</java.version>
      <spring-cloud-gcp.version>4.1.2</spring-cloud-gcp.version>
      <spring-cloud.version>2022.0.1</spring-cloud.version>
   </properties>
   <dependencies>
      <dependency>
         <groupId>org.springframework.boot</groupId>
         <artifactId>spring-boot-starter-actuator</artifactId>
      </dependency>
      <dependency>
         <groupId>org.springframework.boot</groupId>
         <artifactId>spring-boot-starter-web</artifactId>
      </dependency>
      <dependency>
         <groupId>com.google.cloud</groupId>
         <artifactId>spring-cloud-gcp-starter</artifactId>
      </dependency>
      <dependency>
         <groupId>io.micrometer</groupId>
         <artifactId>micrometer-tracing-bridge-brave</artifactId>
      </dependency>
      <!-- Add Cloud Trace Starter -->
      <dependency>
         <groupId>com.google.cloud</groupId>
         <artifactId>spring-cloud-gcp-starter-trace</artifactId>
      </dependency>

      <dependency>
         <groupId>org.springframework.boot</groupId>
         <artifactId>spring-boot-starter-test</artifactId>
         <scope>test</scope>
      </dependency>
   </dependencies>
   <dependencyManagement>
      <dependencies>
         <dependency>
            <groupId>org.springframework.cloud</groupId>
            <artifactId>spring-cloud-dependencies</artifactId>
            <version>${spring-cloud.version}</version>
            <type>pom</type>
            <scope>import</scope>
         </dependency>
         <dependency>
            <groupId>com.google.cloud</groupId>
            <artifactId>spring-cloud-gcp-dependencies</artifactId>
            <version>${spring-cloud-gcp.version}</version>
            <type>pom</type>
            <scope>import</scope>
         </dependency>
      </dependencies>
   </dependencyManagement>

   <build>
      <plugins>
         <plugin>
            <groupId>org.springframework.boot</groupId>
            <artifactId>spring-boot-maven-plugin</artifactId>
         </plugin>
      </plugins>
   </build>

</project>
application.properties
spring.application.name=customer

# All traces should be sent to latency analysis tool
management.tracing.sampling.probability=1.0

# traceID and spanId are predefined MDC keys - we want the logs to include them
logging.pattern.level=%5p [${spring.application.name:},%X{traceId:-},%X{spanId:-}]
Create MyConfiguration.java
 package com.example.customer.config;
import org.springframework.boot.web.client.RestTemplateBuilder;
import org.springframework.context.annotation.Bean;
import org.springframework.context.annotation.Configuration;
import org.springframework.web.client.RestTemplate;

@Configuration(proxyBeanMethods = false)
class MyConfiguration {
    // IMPORTANT! To instrument RestTemplate we must inject the RestTemplateBuilder
    @Bean
    RestTemplate restTemplate(RestTemplateBuilder builder) {
        return builder.build();
    }
}
To instrument RestTemplate we must inject the RestTemplateBuilder.
CustomerController.java
package com.example.customer.controller;

import org.springframework.beans.factory.annotation.Autowired;
import org.springframework.web.bind.annotation.GetMapping;
import org.springframework.web.bind.annotation.RestController;
import org.springframework.web.client.RestTemplate;
import org.slf4j.Logger;
import org.slf4j.LoggerFactory;

@RestController
public class CustomerController {

    private static final Logger LOG = LoggerFactory.
            getLogger(CustomerController.class);

    @Autowired
    RestTemplate restTemplate;

    @GetMapping(value = "/customer")
    public String customer() {

        LOG.info("Inside customer service");

        String responseFromProductService = restTemplate.
                getForObject("http://localhost:9080/product",
                        String.class);
        LOG.info("Successfully communicated " +
                "with product service");

        return responseFromProductService+" -> Customer Service running!";
    }
}
Application.java
package com.example.customer;

import org.springframework.boot.SpringApplication;
import org.springframework.boot.autoconfigure.SpringBootApplication;

@SpringBootApplication
public class Application {

   public static void main(String[] args) {
      SpringApplication.run(Application.class, args);
   }

}
Application is the entry point that sets up the Spring Boot application. The @SpringBootApplication annotation enables auto-configuration and component scanning.
2. Creating a simple 'product' service web application
First, open the Spring initializr https://start.spring.io/
Then, Provide the Group and Artifact name. We have provided Group name com.knf.dev.demo and Artifact product. Here I selected the Maven project - language Java 17 - Spring Boot 3.0.4 and add Spring web dependency, GCP Support, and Distributed Tracing.

Then, click on the Generate button. When we click on the Generate button, it starts packing the project in a .zip(product) file and downloads the project. Then, Extract the Zip file.
Then, import the project on your favourite IDE.
Final Project directory:

In the pom.xml, add Cloud Trace Starter:
<!-- Add Cloud Trace Starter -->
<dependency>
   <groupId>com.google.cloud</groupId>
   <artifactId>spring-cloud-gcp-starter-trace</artifactId>
</dependency>
<!-- Add Cloud Trace Starter -->
<dependency>
<groupId>com.google.cloud</groupId>
<artifactId>spring-cloud-gcp-starter-trace</artifactId>
</dependency>
Complete pom.xml
<?xml version="1.0" encoding="UTF-8"?>
<project xmlns="http://maven.apache.org/POM/4.0.0"
       xmlns:xsi="http://www.w3.org/2001/XMLSchema-instance"
   xsi:schemaLocation="http://maven.apache.org/POM/4.0.0
   https://maven.apache.org/xsd/maven-4.0.0.xsd">
   <modelVersion>4.0.0</modelVersion>
   <parent>
      <groupId>org.springframework.boot</groupId>
      <artifactId>spring-boot-starter-parent</artifactId>
      <version>3.0.4</version>
      <relativePath/> <!-- lookup parent from repository -->
   </parent>
   <groupId>com.example</groupId>
   <artifactId>product</artifactId>
   <version>0.0.1-SNAPSHOT</version>
   <name>product</name>
   <description>Demo project for Spring Boot</description>
   <properties>
      <java.version>17</java.version>
      <spring-cloud-gcp.version>4.1.2</spring-cloud-gcp.version>
      <spring-cloud.version>2022.0.1</spring-cloud.version>
   </properties>
   <dependencies>
      <dependency>
         <groupId>org.springframework.boot</groupId>
         <artifactId>spring-boot-starter-actuator</artifactId>
      </dependency>
      <dependency>
         <groupId>org.springframework.boot</groupId>
         <artifactId>spring-boot-starter-web</artifactId>
      </dependency>
      <dependency>
         <groupId>com.google.cloud</groupId>
         <artifactId>spring-cloud-gcp-starter</artifactId>
      </dependency>
      <dependency>
         <groupId>io.micrometer</groupId>
         <artifactId>micrometer-tracing-bridge-brave</artifactId>
      </dependency>
      <!-- Add Cloud Trace Starter -->
      <dependency>
         <groupId>com.google.cloud</groupId>
         <artifactId>spring-cloud-gcp-starter-trace</artifactId>
      </dependency>

      <dependency>
         <groupId>org.springframework.boot</groupId>
         <artifactId>spring-boot-starter-test</artifactId>
         <scope>test</scope>
      </dependency>
   </dependencies>
   <dependencyManagement>
      <dependencies>
         <dependency>
            <groupId>org.springframework.cloud</groupId>
            <artifactId>spring-cloud-dependencies</artifactId>
            <version>${spring-cloud.version}</version>
            <type>pom</type>
            <scope>import</scope>
         </dependency>
         <dependency>
            <groupId>com.google.cloud</groupId>
            <artifactId>spring-cloud-gcp-dependencies</artifactId>
            <version>${spring-cloud-gcp.version}</version>
            <type>pom</type>
            <scope>import</scope>
         </dependency>
      </dependencies>
   </dependencyManagement>

   <build>
      <plugins>
         <plugin>
            <groupId>org.springframework.boot</groupId>
            <artifactId>spring-boot-maven-plugin</artifactId>
         </plugin>
      </plugins>
   </build>

</project>
application.properties
spring.application.name=product
server.port=9080

# All traces should be sent to latency analysis tool
management.tracing.sampling.probability=1.0

# traceID and spanId are predefined MDC keys - we want the logs to include them
logging.pattern.level=%5p [${spring.application.name:},%X{traceId:-},%X{spanId:-}]
ProductController.java
package com.example.product.controller;

import org.slf4j.Logger;
import org.slf4j.LoggerFactory;
import org.springframework.web.bind.annotation.GetMapping;
import org.springframework.web.bind.annotation.RestController;

@RestController
public class ProductController {

    private static final Logger LOG = LoggerFactory.
            getLogger(ProductController.class);

    @GetMapping(value = "/product")
    public String product() {

        LOG.info("Inside product service");

        return "Product Service running!";
    }
}
Application.java
package com.example.product;

import org.springframework.boot.SpringApplication;
import org.springframework.boot.autoconfigure.SpringBootApplication;

@SpringBootApplication
public class Application {

   public static void main(String[] args) {
      SpringApplication.run(Application.class, args);
   }

}
3. Upload Source code to GitHub
First, sign in to Github https://github.com/
Then, upload the source code from your local machine to the GitHub.

4. Create a GCP Project
First, Sign into the Google console at https://console.cloud.google.com.
You can create a new project by first selecting the project dropdown in the top left and selecting "New Project".

Next, specify your GCP Project name and Project ID.
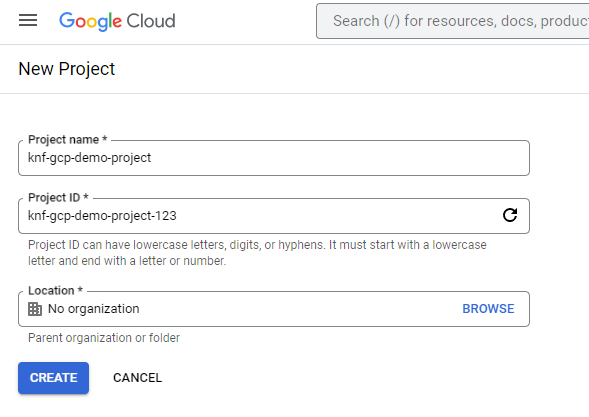
Then Click on the "CREATE" button.
5. Enable Cloud Trace API
Start the Google Cloud Shell in the browser.
Button to activate cloud shell is marked in the below image.

To enable the Cloud Trace API, execute:
gcloud services enable cloudtrace.googleapis.com
6. Clone the github repository
git clone https://github.com/knowledgefactory4u/spring-cloud-gcp-examples.git
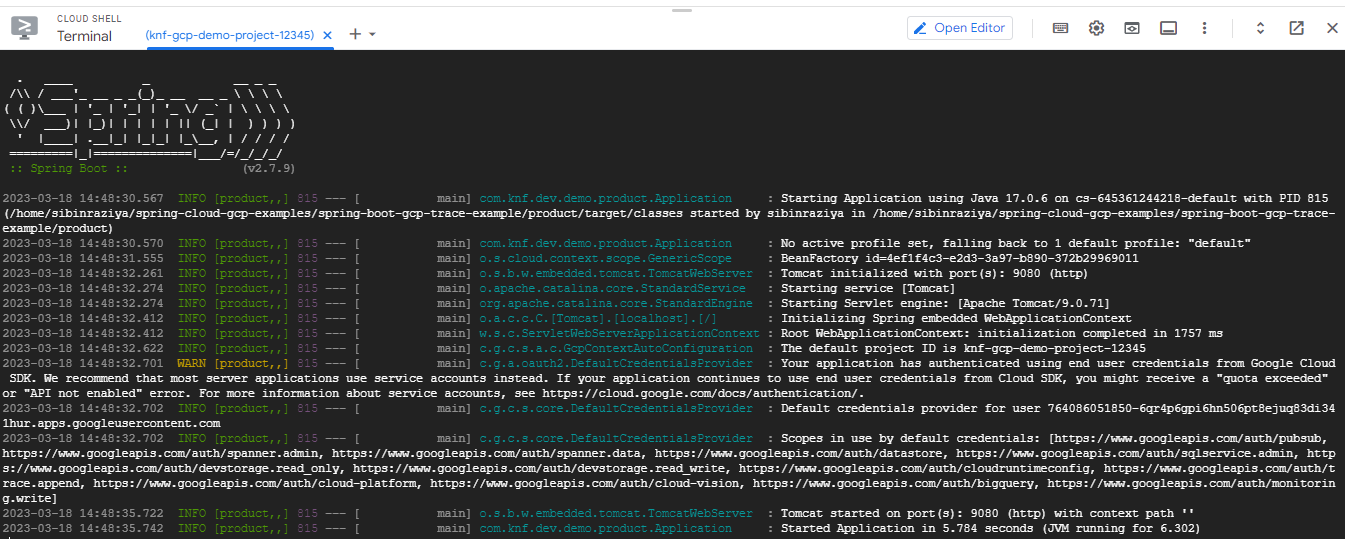
7. Start the product application
Before starting the application, Setup Application Default Credential.
First, login - Execute below command:
gcloud auth application-default login

Click on the link to open a new browser tab, and then click Allow button.

Then, copy verification code.

Then, paste the verification code back into Cloud Shell and press enter. You should see:
Then, change the directory to product.
cd spring-cloud-gcp-examples/spring-boot-micrometer-tracing-gcp-trace-example/product
You can start the product application normally with the Spring Boot plugin.
mvn -DskipTests spring-boot:run
8. Start the customer application
Open a new Cloud Shell session by clicking on the + icon:

Before starting the application, Setup Application Default Credential.
First, login - Execute below command:
gcloud auth application-default login
Click on the link to open a new browser tab, and then click Allow button.
Then, copy verification code.
Then, paste the verification code back into Cloud Shell and press enter. You should see:
Then, change the directory to customer.
cd spring-cloud-gcp-examples/spring-boot-micrometer-tracing-gcp-trace-example/customer
You can start the customer application normally with the Spring Boot plugin.
mvn -DskipTests spring-boot:run
Once the application started, click on the Web Preview icon in the Cloud Shell toolbar and choose preview on port 8080.

After a short wait you should see the result, then hit /customer endpoint.

In Cloud Shell 1(product), you should also see the log messages with trace ID and span ID:
In Cloud Shell 2(customer), you should also see the log messages with trace ID and span ID:
Here, the Trace ID is propagated from one service to another.
9. Find and view traces
From cloud console, search for "Trace list" like below and click on "Trace list" button.

In Cloud Trace's Trace List, you should see the trace:

You can click on the blue dot and see the trace detail: